
Table of Contents
- Getting Started
- Abilities
- Well of Souls
- Rituals
- Upgrading your Gear
- Training Methods
- Skill Timeline
Unlike other skills, Necromancy has much of its progression tied to a story-line in a series of quests. The first one, aptly named Necromancy!, is how you unlock the ability to train the skill. This quest functions as a tutorial for the skill. When finished, be sure to visit Sostratus on the South East docks to obtain a free set of Deathwarden robes. If you ever find yourself unsure of what to do next, consult the Skill Timeline below.
In the powers page for Necromancy you will see there are 2 sections: Abilities and Incantations. All incantations are tied to the Well of Souls and require runes to use, so we will discuss them later. Each Necromancy ability requires you to wield a siphon, such as the Death guard you receive during the tutorial quest. The conjuring abilities require you to wield a conduit, such as the Skull lantern, and use a resource called Ectoplasm to use. For clarity, we will refer to these abilities as Siphoning Attacks and Conjures, respectively.
For now, here is a brief overview of the Necromancy abilities.
| Ability | Level | Type | Enemies Affected | Unlock? |
| Necromancy Basic Attack  |
N/A | Siphoning | Primary target | N/A |
Conjure Skeleton Warrior |
2 | Conjure | N/A | Talent Tree |
Finger of Death |
8 | Siphoning | Primary target | N/A |
Touch of Death |
13 | Siphoning | Primary target | N/A |
Death Skulls |
28 | Siphoning | Primary target, plus up to 4 more within 6 tiles of each other; bounces between enemies, but will bounce off you for no damage if no other targets are in range | N/A |
Blood Siphon |
36 | Siphoning | Primary target and up to 25 enemies within 2 tiles of you | N/A |
Conjure Putrid Zombie |
40 | Conjure | N/A | Talent Tree |
Conjure Vengeful Ghost |
40 | Conjure | N/A | Talent Tree |
Bloat |
48 | Siphoning | Primary target | N/A |
Soul Sap |
54 | Siphoning | Primary target | N/A |
Soul Strike |
54 | Siphoning | Primary target and up to 9 enemies adjacent to them | N/A |
Spectral Scythe   |
62 | Siphoning | Primary target and up to 9 additional enemies in a frontal cone in the direction of the primary target, then up to 25 enemies within 2 tiles of you for the 2nd and 3rd cast | Talent Tree to unlock the base, 2nd, and 3rd strike |
Volley of Souls |
66 | Siphoning | Primary target | N/A |
Living Death |
76 | Siphoning | N/A | N/A |
Conjure Undead Army |
99 | Conjure | N/A | Talent Tree |
As mentioned above, siphoning attacks have no requirements for use other than wielding a siphon in your main hand. That said, some of them are unlocked through the Talent Tree at the Well of Souls. The following table explains siphoning attacks in more detail.
| Ability | Level | Description | Resource | Cooldown |
| Necromancy Basic Attack |
N/A | Attack the target. Automatically triggered during combat when no other abilities on your revolution bar are available unless you have chosen otherwise in your combat mode settings | Generates adrenaline | Global cooldown; 1.8 seconds |
| Finger of Death |
8 | Inflict searing pain on your target, dealing 270-330% Necromancy damage. The adrenaline cost is reduced by 10% for each Necrosis stack. Consumes up to 6 Necrosis stacks. | Costs 60% adrenaline | Global cooldown; 1.8 seconds |
| Touch of Death |
13 | Touch your target with a hand of Death, dealing 90-110% Necromancy damage. Generates 4 Necrosis stacks. | Generates adrenaline | 14.4 seconds |
| Death Skulls |
28 | Launch a flurry of skulls at the target. Deals 225-275% Necromancy damage per hit. Bounces between enemies within 6 tiles of each other up to 4 times. This prioritizes enemies with higher maximum life points. If there are no enemies nearby, it will instead bounce to the caster (assuming in range), dealing no damage to them | Costs 100% adrenaline | 60 seconds |
| Blood Siphon |
36 | Siphon blood from enemies before releasing a powerful attack on your target. This channeled attack deals 22-28% Necromancy damage per hit every 1.2 seconds to up to 25 enemies within 2 tiles of you (excluding your target), for a maximum of 4 hits. You heal for 70% of the damage dealt during this channel. If the channel completes, you will deal Necromancy damage equal to the total amount you healed plus an additional 117-143% Necromancy damage to your target | None | 45 seconds |
| Bloat |
48 | Bloat your target, dealing 135-165% Necromancy damage and applying Bloated to them for 18 seconds. Every 1.8 seconds, Bloated enemies take 25% of the damage that this attack dealt to them, up to a total of 10 times. If they die while Bloated, up to 9 enemies within 1 tile of them will become Bloated for 7.2 seconds (4 hits) | Costs 20% adrenaline | Global cooldown; 1.8 seconds |
| Soul Sap |
54 | Sap your target’s soul, dealing 90-110% Necromancy damage. This ability cannot be used unless wielding a conduit. | Generates adrenaline and 1 Residual Soul, up to a cap of 3 Residual Souls | 5.4 seconds |
| Soul Strike |
54 | Strike your target with a residual soul. This deals 135-165% Necromancy damage and stuns the target for 3 seconds. Additionally, up to 9 enemies within 1 tile of the target take 90-110% Necromancy damage. | Costs 1 Residual Soul | Global cooldown; 1.8 seconds |
| Spectral Scythe (1st Cast) |
62 | Swipe a spectral scythe in front of you. This deals 72-88% Necromancy damage to your target and up to 9 additional enemies in a cone based on the direction of the target. For each enemy hit, you have a 25% chance of generating a Residual Soul
This ability must be unlocked at the Well of Souls, and can be improved twice, each allowing an additional use of the ability. If the 2nd cast has been unlocked, then this ability becomes the 2nd cast for the next 15 seconds. If that ability isn’t used again before the 15 second cooldown expires, then the ability resumes the function of its 1st cast |
Costs 10% adrenaline | 15 seconds |
| Spectral Scythe (2nd Cast) |
62 | Swipe a spectral scythe around you. This deals 180-220% Necromancy damage to your primary target and up to 25 additional enemies within 2 tiles of you. For each enemy hit, you have a 25% chance of generating a Residual Soul (this applies to the 2nd cast as well, see below).
This ability must be unlocked at the Well of Souls, and can be improved twice, each allowing an additional use of the ability. If the 3rd cast has been unlocked, then this ability becomes the 3rd cast for the next 15 seconds. If that ability isn’t used again before the 15 second cooldown expires, then the ability resumes the function of its 1st cast |
Costs 20% adrenaline | 15 seconds |
| Spectral Scythe (3rd Cast) |
62 | Leap high into the air and crash down with a spectral scythe to hurt enemies nearest to you. This deals deals 225-275% Necromancy damage to your primary target and up to 25 additional enemies within 2 tiles of you, and that damage is increased by up to 100% based on the enemy’s missing life points.
This ability must be unlocked at the Well of Souls, and can be improved twice, each allowing an additional use of the ability |
Costs 30% adrenaline | 15 seconds |
| Volley of Souls |
66 | Send a volley of residual souls towards the target. This deals 135-165% Necromancy damage for each Residual Soul you have upon casting the ability. It deals 55% of its normal damage when used against other players | Costs all Residual Souls | Global cooldown; 1.8 seconds |
| Living Death |
76 | Master your instincts and transcend into a Death form. In this form, your Necromancy Basic Attack generates 2 Necrosis stacks, Touch of Death generates an additional 6% adrenaline, Finger of Deal deals 50% more damage, and Death Skulls has its cooldown reduced to 12 seconds. The form lasts for 30 seconds and resets the cooldowns of Touch of Death and Death Skulls when cast | 100% adrenaline | 1 minute 30 seconds |
Unlike siphoning attacks, conjures can only be used if you are wielding both a siphon and a conduit: should you unequip the conduit, all your active conjures will despawn. All conjures will attack your combat target, including swapping focus if your combat target changes. They last for 42 seconds after being conjured (although this can be increased in the Talent Tree). They also require Ectoplasm to fuel them, which is a resource obtained as a by-product of Rituals.
Conjures must all be unlocked in the Talent Tree at the Well of Souls. Talent Points can also be spent to improve them by increasing their duration or adding a secondary ability that replaces the conjure ability while the conjure is active.
| Ability | Level | Description | Costs | Secondary Ability |
| Conjure Skeleton Warrior |
2 | Conjure a Skeleton Warrior from the Underworld, filled with uncontrollable anger. While attacking your target (in melee range only), it will deal 22-28% Necromancy spirit damage every 3 seconds. Each time it attacks, it gains 1 Rage. The damage it deals is increased by 3% for each Rage | 1  Ectoplasm |
Command Skeleton Warrior |
| Conjure Putrid Zombie |
40 | Conjure a Putrid Zombie from the Underworld that emits a fetid stench. While attacking your target (in melee range only), it will deal 18-22% Necromancy spirit damage every 3.6 seconds. It also deals 8-12% poison damage every 1.8 seconds to all enemies within 1 tile of it. Because this conjure’s secondary ability consumes the conjure, conjuring it has a 30 second cooldown that prevents you from just detonating the zombie on your enemies in rapid succession | 1 Ectoplasm |
Command Putrid Zombie |
| Conjure Vengeful Ghost |
40 | Conjure a Vengeful Ghost from the Underworld that drains the vigor of your enemies. While attacking your target (at a range of up to 7 tiles away), it will deal 18-22% Necromancy spirit damage every 4.2 seconds. It also heals you for 140% of the damage it deals | 1 Ectoplasm |
Command Vengeful Ghost |
| Conjure Undead Army |
99 | Conjure an Undead Army from the Underworld. Right clicking this ability presents the option to customize it. You may select up to 4 conjure abilities. When casting this ability, it will activate all the selected conjure abilities at once, consuming twice the Ectoplasm as the individual conjures would normally cost. If any of the selected conjures are active, using this ability will only cast the chosen conjures that aren’t currently active. If all of them are already active, the ability is disabled | Twice the Ectoplasm as the individual conjures, see description |
None; the conjures’ secondary abilities must be triggered individually. |


Incantations are necromantic abilities that require runes. Necromancy uses a separate set of runes, which are discussed below. All of them require the Rune Mythos quest and most of them require something additional to unlock them, be it through the Talent Tree, another quest, or a codex.
| Incantation | Level | Additional Requirement(s) |
Description | Cost | XP |
City of Um Teleport |
24 | N/A | Teleports you to the City of Um Ritual Site | 5  Spirit runes Spirit runes |
0 |
Lesser Bone Shield |
25 | N/A | Togglable ability. While active, allows you to use non-offensive abilities that require a shield*. Each time you do so, additional runes are consumed equal to the spell’s cost. The abilities function as though you were wielding a shield scaled to 25% of your Necromancy level | 5 Spirit runes 5  Bone runes Bone runes |
44** |
| Threads of Fate  |
44 | Talent Tree | For the next 6.6 seconds, all damage from single-target Necromancy attacks will also be cast on up to 4 additional enemies within 4 tiles of the target. If Invoke Death (see below) is activated when dealing damage to the target, the Death mark will also be applied to the other 4 enemies. 45 second cooldown | 5 Spirit runes 2 Bone runes1  Flesh rune Flesh rune |
107 |
Greater Bone Shield |
73 | Talent Tree and Tomes of the Warlock |
Togglable ability. While active, allows you to use non-offensive abilities that require a shield*. Each time you do so, runes are consumed equal to the spell’s cost. The abilities function as though you were wielding a shield scaled to 50% of your Necromancy level | 10 Spirit runes 10 Bone runes5 Flesh runes |
132** |
Ungael Teleport |
75 | Requiem for a Dragon | Teleports you to the Ungael ritual site | 5 Spirit runes |
0 |
Life Transfer |
76 | Talent Tree and Tomes of the Warlock |
Sacrifice 50% of your base life points to extend the duration of each of your active Conjures by 21 seconds. This damage can be mitigated with the Barricade ability or the Hellhound familiar, and other players can use the intercept spell to take the damage instead of you, but it cannot be used while below 50% of your base life points and has a cooldown of 45 seconds, meaning it cannot sustain any Conjures indefinitely | 10 Spirit runes 5 Bone runes2 Flesh runes1  Miasma rune Miasma rune |
118 |
Invoke Lord of Bones |
78 | Invoke Lord of Bone Ability Codex | Call upon the Lord of Bones for additional power. For the next minute, all attacks from the Skeletal Warrior conjure will apply a stack of Shattering Bones to the target, capping at 200 stacks. Each stack reduces the target’s armor by 0.2%. This incantation has no cooldown | 8 Spirit runes 6 Bone runes2 Flesh runes1 Miasma rune |
168 |
Invoke Death |
80 | Talent Tree and Tomes of the Warlock |
Call on Death for additional power. Your next Necromancy attack will apply Death Mark to the target. If the target has under 20% life points AND under 30,000 life points while marked, they will be immediately executed, taking Necromancy damage equal to their current life points. This has a 3.6 second cooldown, but the Death Mark debuff lasts 12 seconds. It cannot be applied to other players | 5 Spirit runes 2 Bone runes2 Flesh runes1 Miasma rune |
157 |
Darkness |
86 | Talent Tree and Tomes of the Warlock |
Shroud yourself in darkness. This applies the Aspect of Evasion to you: you may only have one Aspect active at once+. For the next 12 minutes, you have a 20% chance to dodge incoming attacks | 40 Spirit runes 20 Bone runes10 Flesh runes5 Miasma runes |
178 |
Split Soul |
92 | Talent Tree and Temple at Senntisten |
Unleash a dark power within. For the next 20.4 seconds, the Soul Split Curse doesn’t heal you, and instead deals Necromancy damage equal to 4x the amount you would have healed to your primary target. 1 minute cooldown | 10 Spirit runes 5 Bone runes2 Flesh runes1 Miasma rune |
171 |
*The abilities that can be used this way are Barricade, Divert, Immortality, Preparation, Reflect, Rejuvenate, and Resonance.
**XP is gained whenever the incantation consumes runes.
+Currently, the only other aspect is Animate Dead.
Necromancy uses its own family of runes, called necrotic runes, to use Incantations. Unlike other runes, these cannot be made directly from Rune or Pure essence. They must be crafted from Impure essence, which is made from Pure essence via Ritual. Both the making of Impure essence and the crafting of necrotic runes are locked behind the Rune Mythos quest. Like with Rune and Pure essence, Impure essence can be stored in Rune pouches. To decide what kind of Essence is stored in your rune pouch when using a bank preset or using the fill option, Right click a pouch and choose configure. All the necrotic runecrafting altars are located in Um, accessed just North East of the smithy by entering the dark portal in the middle of the lake. For more information on necrotic runes, see the table below.
| Runes | Runecrafting Level |
Experience per Essence |
Multiple Runes per Essence | ||||||||
| 2 | 3 | 4 | 5 | 6 | 7 | 8 | 9 | 10 | |||
| Spirit runes |
1 | 11 | 11 | 22 | 33 | 44 | 55 | 66 | 77 | 88 | 99 |
| Bone runes |
20 | 15 | 46 | 92 | - | - | - | - | - | - | - |
| Flesh runes |
40 | 17.4 | 82 | - | - | - | - | - | - | - | - |
| Miasma rune |
60 | 20 | - | - | - | - | - | - | - | - | - |
In this section, we will break down 3 action bars: 1 for when you don't have many abilities unlocked yet and 2 for when you have all the abilities unlocked, but may or may not being trying to deal damage to multiple enemies.
Lower Levels (under level 50 Necromancy)

- At lower levels, the best damage rotations are very simple as there are not a lot of options yet. Conjure Skeleton Warrior and Necromancy Basic Attacks make up the core of your damage. Command Skeleton Warrior significantly increases your damage and should be unlocked as soon as possible. Touch of Death does respectable damage and helps build necrosis stacks to use later on.
- Conjure Vengeful Ghost provides a little damage, but is mostly used for the healing that Command Vengeful Ghost provides.
- Conjure Putrid Zombie can be used to add some extra damage, but it deals poison damage, which doesn't earn you experience. Since the amount of XP earned scales with the lifepoints of the monsters killed, this can be hinderance early on. It is also not advised for revolution setups in early levels as Command Putrid Zombie explodes the zombie, which can cost a lot of Ectoplasm over time.
- Bloat and Blood Siphon don't offer great damage and are best used in situations with many enemies, but at lower levels there are few uses for your adrenaline, so they are solid choices for now. Blood siphon can be moved earlier in the bar for situations where more healing is required. Keep in mind that the damage dealt by the death of Bloated enemies will not cause passive monsters stuck to become aggressive towards you, but those who take damage from the channel of Blood Siphon will.
- Finger of Death is the real star of low level necromancy, doing big damage and the adrenanline cost is reduced by 10% per necrosis stack all the way down to 0%, making it free to use in the right situations. It should be fired off as often as possible when you have 6+ necrosis stacks (note that Touch of Death builds only 4 stacks of necrosis, meaning that 3 Touches of Death will pay for 2 Fingers of Death).
- Death Skulls costs 100% adrenaline, and in early necromancy levels you'll struggle to pay that cost, but if you have the adrenaline it's worth using. Note that any passive enemies that are struck by this will become aggressive towards you.
- As with most action bars, Tuska's Wrath and Sacrifice are merely present for the utility and will used manually most of the time. Necromancy Basic Attack should be used before them.
Area Damage Action Bar

- Conjure Undead Army should be set up to conjure the Skeleton Warrior, Vengeful Ghost, and Putrid Zombie to get all your minions up right away.
- For maximizing your area damage, Command Skeleton Warrior and Vengeful Ghost are forfeited, as while they do nice damage when they hit, they will spend a lot of time running at new targets. Their use can be omitted entirely to save Ectoplasm, but it will slow down kills.
- Command Putrid Zombie is early on the bar, as you want your zombie to explode and do big damage as often as possible. This does come at a high Ectoplasm cost, and the zombie's poison damage doesn't contribute to combat XP, so this should be omitted if your main goal is XP rather than fast kills. You can mitigate the Ectoplasm cost by only using Command Putrid Zombie when its duration has almost expired.
- Death Skulls features nice and early as its bouncing multi-target damage is great for racking up damage on many targets.
- Spectral Scythe (fully upgraded) excels for area damage rotations as the damage it does to any one single target isn't great but the total damage dealt when surrounded by enemies is enormous.
- Soul Strike is favored over Volley of Souls for area damage rotations as monsters tend to be lower health so the big hits from Volley of Souls tend to be overkill and a waste of the souls, not mention that Soul Strike deals damage to enemies adjacent to the target. Keep in mind that it does stun the target as well, so it should be avoided when fighting Yakamaru, for example.
- Blood Siphon appears quite late in the bar for good reason. It's not the best damage, but it offers some nice healing when surrounded by enemies to help sustain longer trips; it can be moved earlier in the rotation to achieve more frequent heals at a hinderance to your damage rate.
- Finger of Death remains in its usual role to be cast whenever 6+ necrosis is reached.
- Unlike other bars or rotations, where use of Incantations is useful but not vital to maximizing your damage, the use of Threads of Fate when casting Finger of Death is incredibly powerful.
- As with most action bars, Tuska's Wrath and Sacrifice are merely present for the utility and will used manually most of the time. Necromancy Basic Attack should be used before them.
Single Target Action Bar

- Conjure Undead Army should be set up to conjure the Skeleton Warrior, Vengeful Ghost, and Putrid Zombie to get all your minions up right away.
- Sap Soul and Touch of Death are both early on as using stacks of souls and necrosis for big damage is the key to dealing good damage with necromancy.
- Volley of Souls should be used whenever 3 souls are accumulated (or 5 if you're wielding a Soulbound Lantern).
- Finger of Death should be used whenever 6 necrosis stacks as accumulated, the Death guard special attack should also be used whenever it is off cooldown, ideally with 6+ necrosis stacks. Keep in mind that the Death guard attack does stun the target, so it should be avoided when fighting Yakamaru, for example.
- If you do not have a Igneous Kal-Mor (aka the Necromancy Zuk cape), you are unlikely to build enough adrenaline to use Death skulls or Living Death without some significant luck on the activation of Invention perks like relentless and/or impatient. In general, for single target fighting, Living Death should be prioritized over Death Skulls.
- As with most action bars, Tuska's Wrath and Sacrifice are merely present for the utility and will used manually most of the time. Necromancy Basic Attack should be used before them.
- If you want an entirely single target bar with no risk of hitting secondary enemies, Death Skulls and Conjure Putrid Zombie should be omitted entirely.
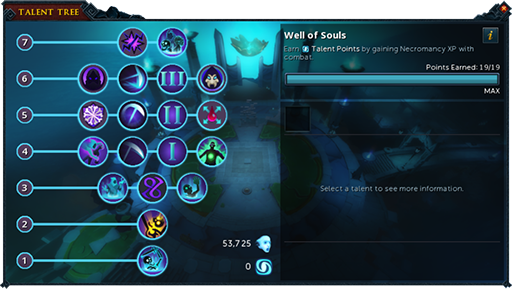
Part of the plot of Necromancy! is that Rasial has taken all the souls from the City of Um and your goal as a necromancer is to repopulate it. On the surface this seems like a purely narrative element, but the truth is that populating this City of Um is a major priority as it provides access to the Necromancy talents system in addition to impacting the requirements for some Necromancy related quests. Progress in this regard is tracked by the number of inhabitants in the Well of Souls, which can be determined by inspecting it, even from across the Um Ritual Site. Smaller quantities of souls can be accrued by talking to inhabitants of the city for the first time, including recruiting rats, and by completing quests related to Necromancy. However, the bulk of your souls will be obtained by completing Communion rituals. The image below is a fully completed talent tree.
The talents for Necromancy come in a series of 7 tiers, each having their own prerequisites (see the table below). Every tier requires a number of vessel souls, a Necromancy level, and a talent from the previous tier unlocked. Many of the specific talents have additional requirements (all such talents are underlined). Unlocking a talent costs a talent point, discussed further below.
| Tier 1 | |||||||||||
| Level 1 Necromancy | No Vessel Souls Required | ||||||||||
|
|||||||||||
| Tier 2 | |||||||||||
| Level 20 Necromancy | Requires 50 Vessel Souls | ||||||||||
Command Skeleton Warrior Requires Conjure Skeleton Warrior |
|||||||||||
| Tier 3 | |||||||||||
| Level 40 Necromancy | Requires 400 Vessel Souls and completion of Rune Mythos | ||||||||||
|
Threads of Fate Requires 44 Necromancy |
|
|||||||||
| Tier 4 | |||||||||||
| Level 60 Necromancy | Requires 2,00 Vessel Souls | ||||||||||
Command Vengeful Ghost Requires Conjure Vengeful Ghost |
Spectral Scythe Requires 62 Necromancy |
Spirit Pact I Increases the duration ofConjures by 6 seconds |
Command Putrid Zombie Requires Conjure Putrid Zombie |
||||||||
| Tier 5 | |||||||||||
| Level 70 Necromancy | Requires 4,500 Vessel Souls | ||||||||||
Greater Bone Shield Requires Tomes of the Warlock and 73 Necromancy |
(upgrade 1) Adds an additional cast, see the ability descriptionRequires Spectral Scythe |
Spirit Pact II Increases the duration of Conjures by an additional 6 seconds, to a total of 12 secondsRequires Spirit Pact I |
Life Transfer Requires Tomes of the Warlock and 76 Necromancy |
||||||||
| Tier 6 | |||||||||||
| Level 80 Necromancy | Requires 8,500 Vessel Souls | ||||||||||
Darkness Requires Tomes ofthe Warlock and 86 Necromancy |
(upgrade 2) Adds an additional cast, see the ability descriptionRequires Spectral Scythe (upgrade 1) |
Spirit Pact III Increases the duration of Conjures by an additional 6 seconds, to a total of 18 secondsRequires Spirit Pact II |
Invoke Death Requires Tomes of the Warlock |
||||||||
| Tier 7 | |||||||||||
| Level 90 Necromancy | Requires 35,000 Vessel Souls | ||||||||||
Split Soul Requires Temple at Senntisten, Tomes of the Warlock, and 92 Necromancy |
Conjure Undead Army Requires 99 Necromancy |
||||||||||


In addition to their prerequisites, each talent costs a talent point. Talent points are gained by gaining Necromancy and Defence experience exclusively through combat. Thus, you cannot gain access to them by completing quests, doing Rituals, using experience lamps, and so on. 19 talent points are required to fully unlock the Talent Tree. This completes the “Talented in Necromancy" achievement, which is a requirement for the Completionist cape. To track your progress towards a new talent point, manage your talents at the Well of Souls. To see how much experience you need to get each talent point, consult the table below.
| Talent Point | Experience Required | Total Experience |
| 1 | 80 | 80 |
| 2 | 2,000 | 2,080 |
| 3 | 8,000 | 10,080 |
| 4 | 18,000 | 28,080 |
| 5 | 32,000 | 60,080 |
| 6 | 50,000 | 110,080 |
| 7 | 72,000 | 182,080 |
| 8 | 98,000 | 280,000 |
| 9 | 128,000 | 408,080 |
| 10 | 162,000 | 570,080 |
| 11 | 200,000 | 770,080 |
| 12 | 242,000 | 1,012,080 |
| 13 | 288,000 | 1,300,080 |
| 14 | 338,000 | 1,638,080 |
| 15 | 392,000 | 2,030,080 |
| 16 | 450,000 | 2,480,080 |
| 17 | 512,000 | 2,992,080 |
| 18 | 578,000 | 3,570,080 |
| 19 | 648,000 | 4,218,080 |
Rituals are the aspect of Necromancy training done outside of combat. Its primary purposes are to create Impure essence, add souls to the Well of Souls, and create materials to upgrade your gear.
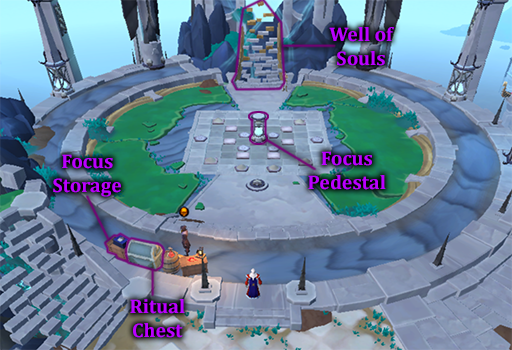
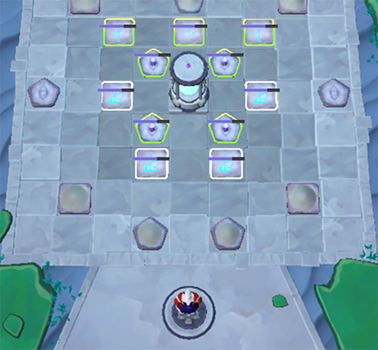
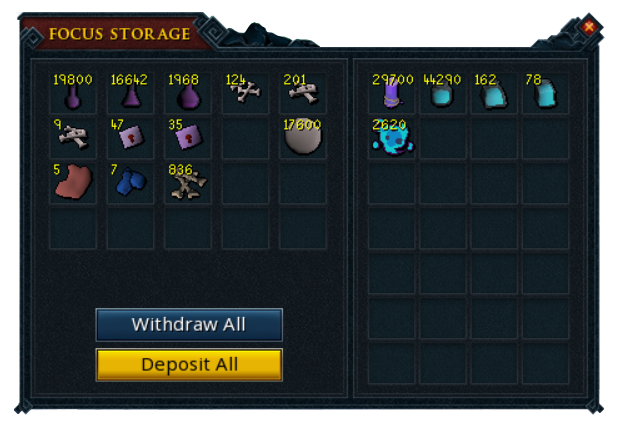
Rituals must be performed in the space provided South of the Well of Souls. Each ritual has a level requirement and components needed in order to perform it. These take the form of a focus, glyphs, and light sources - all of which are discussed further below. On the South side of the site, just outside the grassy area, you can find the focus storage and ritual chest. Any items that can be used as a ritual focus can be put in the focus storage, but it has a limit of 20 item spaces, so use them wisely. Whenever you complete a ritual, any output will be stored in the ritual chest. The pedestal is where the ritual focus is placed and clicking that option opens the ritual menu. It also has a Right click option to clear the site of all glyphs and light sources.
As mentioned, each ritual’s input is placed on the pedestal as the focus of the ritual. The input is consumed as part of the ritual in order to create the output, although you will always receive some Ectoplasm as a by-product of the ritual process. Note that for some rituals the input can be one of several items. Changing the specific input can change the resulting output. This is one of the reasons why you can select from all the possible inputs in the upper Right corner of the interface.
Laying Out Your Ritual Components
The ritual site starts off rather small, with 4 Light source spots, 5 Glyph spots, and the central pedestal. As you gain levels, the number of spots you can use in the ritual site increases, as seen in the table below. When setting up your ritual components, the positions they occupy are irrelevant: only the number of each type matters.
| Site Tier | Level | Light Source Spots | Glyph Spots | Image |
| 1 | 1 | 5 | 4 |  |
| 2 | 60 | 7 | 6 |  |
| 3 | 90 | 11 | 10 |  |
The light source spots are pentagonal in shape. While higher level candles do have higher durability, it isn’t worth the resources to make higher level candles. Buying the Basic ritual candles from Lupe for 1 Coin each is generally the better choice. However, once you get into the higher level rituals, the Disturbances will often award you with higher level light sources faster than they can be used. At that point you may as well use them, if only to prevent them from taking up bank space. Despite other light sources generally not being worth your time, they can be made (see the table below).
| Candle | Durability | How to Obtain | Cost/Materials | Creation Experience |
 Basic ritual candle Basic ritual candle |
6 | Purchased from Lupe | 3 Coins | N/A |
 White candle (lit)* White candle (lit)* |
9 | Lit after purchasing from various shops |
30 Coins | N/A |
 Regular ritual candle Regular ritual candle |
12 | Made | 1 Basic ritual candle 1  Lesser necroplasm Lesser necroplasm |
10.5 |
 Greater ritual candle Greater ritual candle |
18 | Made | 1 Regular ritual candle 1  Greater necroplasm Greater necroplasm |
22 |
 Greater flaming skull** Greater flaming skull** |
36 | Defile Reward | N/A | N/A |
*While White candle (lit) can be used for rituals, it is recommended not to use them because unlike the other candles, they do not stack in a single inventory space, forcing you to resupply frequently.
**Greater flaming skulls are in a similar situation to the White candles (lit), but you do not need to resupply them frequently on account of them having a durability of 36. If you are successfully completing the Defile Disturbance, you will collect these much faster than you will use them.
Glyphs can be drawn on any of the available square spots. Foundational glyphs are the ones that are specifically required for rituals. Any Foundational glyphs drawn in addition to those required for a ritual will have no impact on it. However, the extra glyph spots can be used to draw Alteration glyphs instead, which modify the ritual in some way. Unlike Foundational glyphs, Alteration glyphs require Ectoplasm to be drawn in addition to Inks. Wearing an alteration necklace will increase their effects by 20%.
| Foundational Glyphs | |||||
| Glyph | Level | Relevant Rituals | Materials to Draw |
Durability | XP |
| Change Glyphs | |||||
Change I |
20 | Lesser Ensoul Material Lesser Essence |
2x  Basic ghostly ink Basic ghostly ink1x  Regular ghostly ink Regular ghostly ink |
6 | 21 |
Change II |
60 |
Ensoul Material
Greater Ensoul Material Greater Essence |
1x Regular ghostly ink 2x  Greater ghostly ink Greater ghostly ink |
12 | 44 |
Change III |
95 | Powerful Essence | 1x Greater ghostly ink 2x  Powerful ghostly ink Powerful ghostly ink |
18 | 84 |
| Commune Glyphs | |||||
Commune I |
1 | Lesser Communion Greater Communion |
4x Basic ghostly ink |
6 | 10 |
Commune II |
60 | Greater Communion Powerful Communion |
4x Greater ghostly ink |
12 | 44 |
Commune III |
90 | Powerful Communion | 4x Powerful ghostly ink |
18 | 60 |
| Elemental Glyphs | |||||
Elemental I |
1 |
Lesser Communion
Lesser Ensoul Material Greater Ensoul Material Lesser Essence Lesser Necroplasm Greater Necroplasm |
3x Basic ghostly ink |
6 | 10 |
Elemental II |
60 |
Greater Communion
Powerful Communion Ensoul Material Greater Ensoul Material Greater Essence Powerful Essence Greater Necroplasm Powerful Necroplasm |
2x Basic ghostly ink 3x Regular ghostly ink |
12 | 44 |
Elemental III |
90 |
Powerful Communion
Powerful Essence Powerful Necroplasm |
2x Regular ghostly ink 3x Greater ghostly ink |
18 | 60 |
| Reagent Glyphs | |||||
Reagent I |
5 | Lesser Necroplasm | 2x Basic ghostly ink |
6 | 10 |
Reagent II |
60 | Greater Necroplasm | 3x Basic ghostly ink 2x Regular ghostly ink |
12 | 44 |
Reagent III |
90 | Powerful Necroplasm | 3x Regular ghostly ink 2x Greater ghostly ink |
18 | 60 |
| Alteration Glyphs | |||||
| Glyph | Level | Glyph Effects | Materials to Draw |
Durability | XP |
| Attraction Glyphs | |||||
Attraction I |
61 | +50% Soul Attraction | 2x Ectoplasm 2x Basic ghostly ink2x Regular ghostly ink |
3 | 66 |
Attraction II |
95 | +100% Soul Attraction | 1x Ectoplasm 1x Greater ghostly ink2x Powerful ghostly ink |
6 | 126 |
Attraction III |
107 | +150% Soul Attraction | 2x Ectoplasm 2x Greater ghostly ink2x Powerful ghostly ink |
9 | 210 |
| Multiply Glyphs | |||||
Multiply I |
30 | +20% Ritual Output(s) (rounded down) +20% Soul Attraction |
1x Basic ghostly ink 1x Ectoplasm2 Regular ghostly ink |
3 | 40.5 |
Multiply II |
66 | +40% Ritual Output(s) (rounded down) +40% Soul Attraction |
2x Basic ghostly ink 1x Ectoplasm2x Regular ghostly ink |
6 | 70.5 |
Multiply III |
103 | +60% Ritual Output(s) (rounded down) +60% Soul Attraction |
2x Ectoplasm 2x Greater ghostly ink2x Powerful ghostly ink |
9 | 181.5 |
| Protection Glyphs | |||||
Protection I |
36 | -30% Soul Attraction | 1x Basic ghostly ink 1x Ectoplasm2x Regular ghostly ink |
3 | 45 |
Protection II |
69 | -60% Soul Attraction | 2x Basic ghostly ink 1x Ectoplasm2x Regular ghostly ink |
6 | 73.5 |
Protection III |
101 | -90% Soul Attraction | 2x Ectoplasm 2x Greater ghostly ink2x Powerful ghostly ink |
9 | 168 |
| Speed Glyphs | |||||
Speed I |
45 | -5% Ritual Duration +30% Soul Attraction |
1x Basic ghostly ink 1x Ectoplasm2x Regular ghostly ink |
3 | 52.5 |
Speed II |
81 | -10% Ritual Duration +60% Soul Attraction |
1x Ectoplasm 2x Greater ghostly ink2x Regular ghostly ink |
6 | 82.5 |
Speed III |
102 | -15% Ritual Duration +90% Soul Attraction |
2x Ectoplasm 2x Greater ghostly ink2x Powerful ghostly ink |
9 | 174 |
Broadly speaking, most rituals fall into 4 categories: Communions, Ensouling Materials, Essence, and Necroplasm. There are also some quest specific rituals, but for more information on them, visit the appropriate quest guide page by looking through the Skill Timeline. There is also a single Ectoplasm ritual.
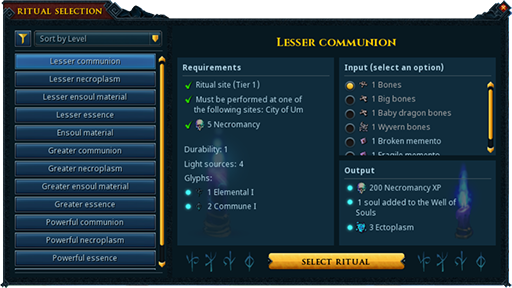
Communion rituals are the primary method to attract souls back to the City of Um to power the Well of Souls. You perform your first lesser communion as part of the Necromancy! quest, which is a requirement for all subsequent communion rituals. They always require a type of Elemental glyph and at least 1 type of Commune glyph. Each communion will attract a number of souls to power the Well of Souls, with the base number dependent on focus you use as the input and what tier of communion you perform: lesser, greater, or powerful.
| Ritual | Level | Required Glyphs |
Light Sources |
Input | Outputs* | ||
| Ectoplasm | Souls | XP | |||||
| Lesser Communion |
5 | 2x Commune I 1x Elemental I |
4 | 1x  Bones Bones |
3x Ectoplasm |
1x Soul added to the Well of Souls |
200 |
1x  Big bones Big bones |
2x Souls added to the Well of Souls |
||||||
1x  Baby Babydragon bones |
3x Souls added to the Well of Souls |
||||||
1x  Wyvern bones Wyvern bones |
4x Souls added to the Well of Souls |
||||||
1x  Broken memento Broken memento |
6x Souls added to the Well of Souls |
||||||
1x  Fragile memento Fragile memento |
8x Souls added to the Well of Souls |
||||||
| Greater Communion |
60 | 1x Commune I 2x Commune II 2x Elemental II |
6 | 1x  Dragon bones Dragon bones |
7x Ectoplasm |
10x Souls added to the Well of Souls |
1,480 |
1x  Dagannoth bones Dagannoth bones |
12x Souls added to the Well of Souls |
||||||
1x  Airut bones Airut bones |
14x Souls added to the Well of Souls |
||||||
1x  Ourg bones Ourg bones(Zogre/Skogre) |
16x Souls added to the Well of Souls |
||||||
1x  Ourg bones Ourg bones(General Graardor) |
|||||||
1x  Hardened Hardeneddragon bones |
18x Souls added to the Well of Souls |
||||||
1x  Dragonkin bones Dragonkin bones |
20x Souls added to the Well of Souls |
||||||
1x  Spirit memento Spirit memento |
24x Souls added to the Well of Souls |
||||||
| Powerful Communion |
90 | 2x Commune II 2x Commune III 4x Elemental III |
10 | 1x  Dinosaur bones Dinosaur bones |
15x Ectoplasm |
30x Souls added to the Well of Souls |
1,480 |
1x  Frost Frostdragon bones |
40x Souls added to the Well of Souls |
||||||
1x  Reinforced Reinforceddragon bones |
50x Souls added to the Well of Souls |
||||||
1x  Robust memento Robust memento |
60x Souls added to the Well of Souls |
||||||
1x  Powerful memento Powerful memento |
75x Souls added to the Well of Souls |
||||||
*The outputs of a ritual can be increased with the use of Multiply Glyphs. These do not increase the inputs, but they do require Inks and Ectoplasm to make.
Ensouling rituals are used to make materials used to upgrade your Necromancy armor and weaponry. You perform your first lesser ensoul material as part of the Kili Row quest, which is a requirement for all subsequent ensouling rituals. They all require a type of Elemental glyph and at least 1 type of Change glyph. Each ensouling ritual will convert a chosen input into either a type of Ensouled bar, Ensouled cloth, or Ensouled thread, with the type dependent on what tier of ensouling you perform: lesser, standard, or greater.


*The outputs of a ritual can be increased with the use of Multiply Glyphs. These do not increase the inputs, but they do require Inks and Ectoplasm to make.
Essence rituals are used to turn Pure essence into Impure essence, the material used to make Necromancy Runes. You perform your first lesser essence ritual as part of the Rune Mythos quest, which is a requirement for all subsequent essence rituals. They all require a type of Elemental glyph and at least 1 type of Change glyph. Each essence ritual will convert the input Pure essence into a base amount of Impure essence that varies by ritual: lesser, greater, or powerful.
| Ritual | Level | Required Glyphs |
Light Sources | Input | Outputs* | Essence Efficiency** |
||
| Ectoplasm | Impure essence | XP | ||||||
| Lesser Essence |
24 | 2x Change I 2x Elemental I |
4 | 200x  Pure essence |
3 Ectoplasm |
40 | 310 | 5 |
| Greater Essence |
80 | 3x Change II 2x Elemental II |
6 | 400x Pure essence |
7 Ectoplasm |
100 | 3,600 | 4 |
| Powerful Essence |
95 | 2x Change II 2x Change III4x Elemental III |
10 | 800x Pure essence |
15 Ectoplasm |
300 | 8,840 | 2 2/3 |
*The outputs of a ritual can be increased with the use of Multiply Glyphs. These do not increase the inputs, but they do require Inks and Ectoplasm to make.
**This number represents the amount of Pure essence being used for each Impure essence being made (thus, a lower value means more efficient). This efficiency improves with the use of Multiply Glyphs.
While all rituals output Ectoplasm as a byproduct, players with 95+ Necromancy can perform a ritual solely to stockpile it.
| Ritual | Level | Required Glyphs |
Light Sources | Input | Output* | |
| Ectoplasm | XP | |||||
| Manifest Ectoplasm | 95 | 2x Change III 2x Elemental II4x Reagent III |
10 | 20x  Bucket of slime |
55 | 6,600 |
*The outputs of a ritual can be increased with the use of Multiply Glyphs. These do not increase the inputs, but they do require Inks and Ectoplasm to make.
Necroplasm rituals are used to turn weaker types of Necroplasm into stronger types. This is highly important because necroplasm is used to make the Inks you need to perform higher level rituals. Each type beyond the Weak necroplasm corresponds to a particular ink. Necroplasm rituals all require 1 type of Reagent glyph and at least 1 type of Elemental glyph. Each necroplasm ritual will convert 200 of the focused necroplasm into 100 necroplasm the next tier up: Lesser, Greater, or Powerful. Because large amounts of necroplasm are needed for the Inks used to perform rituals, do not be afraid to make more necroplasm than you think you need: it will likely be useful later. Furthermore, keep in mind that you will get far more efficient use of these rituals by using Multiply Glyphs.
| Ritual | Level | Required Glyphs |
Light Sources | Input | Outputs* | ||
| Ectoplasm | Necroplasm | XP | |||||
| Lesser necroplasm |
5 | 1x Elemental I 2x Reagent I |
4 | 200x  Weak Weaknecroplasm |
3x Ectoplasm |
100 | 200 |
| Greater necroplasm |
60 | 1x Elemental I 2x Elemental II2x Reagent II |
6 | 200x Lesser necroplasm |
7x Ectoplasm |
100 | 1,480 |
 Powerful Powerfulnecroplasm |
90 | 2x Elemental II 4x Elemental III2x Reagent III |
10 | 200x Greater necroplasm |
15x Ectoplasm |
100 | 6,600 |
*The outputs of a ritual can be increased with the use of Multiply Glyphs. These do not increase the inputs, but they do require Inks and Ectoplasm to make.
Strategies for Efficient Rituals
The general rule when doing rituals is that Multiply Glyphs are your best friend, Protection Glyphs are pointless, and Attraction Glyphs are good if you are actively doing your Disturbances and aren’t yet above 500% Spirit Attraction. Upon skill release, Disturbances would reduce the Durability of your ritual components if not properly addressed. This was the reason the Protection Glyphs were created. It was quickly found that this interaction led to less fun with the skill overall, so it was removed. However, the Protection glyphs remained. Since there is no longer a drawback to Disturbances during your rituals, these glyphs have no significant purpose and shouldn’t be used unless you enjoy wasting your ritual materials.
As far as doing rituals efficiently, the Multiply Glyphs are by far the most useful. The amount of time saved with the Speed glyphs doesn’t measure up to the increased yield of the Multiply glyphs. Keep in mind that the output modifier increases the items or souls output, but has no impact on the input materials or experience gained. This allows you to not only complete your ritual goals faster (by way of reducing the number needed to get what you want out of them), but also reduces the materials required significantly.
However, the Attraction Glyphs are what make it possible to achieve over 500% Spirit Attraction. If your Spirit Attraction is above 500%, then at each time in the ritual where it’s possible to get a disturbance, you are guaranteed to have one. Furthermore, higher Spirit Attraction increases the odds of getting the higher level disturbances, which have better rewards.
As a final note, the Attraction Glyphs material requirements do add up over time, but not as much as they appear to at first glance. For a simple example, a single Multiply I glyph will cost you 1x Ectoplasm, 1x Basic ghostly ink, and 2 Regular ghostly ink for every 3 rituals you do. The durability is what makes this more efficient. If each Alteration glyph was a cost for every ritual, then you would be net losing necroplasm in certain situations. Instead, for each Alteration glyph you are losing the materials for the glyph for every 3 rituals times the tier of the glyph (i. e, Multiply I lasts 3 rituals, Multiply II lasts 6 rituals, and Multiply III lasts 9 rituals). Don’t get hung up on the math, we’ve done enough of it for you! Alteration Glyphs are worth the time and effort if done mindfully.
Disturbances & Spirit Attraction
While you are performing rituals, there will occasionally be disturbances caused by the spirits the rituals attract. These disturbances take 6 possible forms, each only appearing during certain conditions. Successfully managing the disturbances yields Necromancy experience and an item reward that varies by disturbance. All item rewards are placed in the ritual chest. Exception: Necromancer's tomes of experience will always be placed in your inventory, provided that there is space for it.
One of the major conditions is the percentage of Spirit Attraction, which by default is displayed at the top of your screen while at the Ritual Site. With no modifiers to this, it defaults to 100%. However, increasing this percentage by using Alteration Glyphs changes what disturbances can occur. During any ritual, there is a set number of times at which a disturbance can occur; between 2 and 6 times depending on the ritual. At 501% or more a disturbance is guaranteed to occur at each of these intervals. The higher the Spirit Attraction, the better the odds of having higher level disturbances, and thus, the better the rewards.
Despite this, the disturbances that can occur are still limited by the other condition: what ritual is being performed (see the table below). In simplest terms, the Spirit Attraction determines the base distribution of chance for each disturbance, then the tier of the ritual removes some of the possible disturbances.
| Disturbance | Conditions for Spawn | Possible Rewards |
Duration | ||
| Rituals | Soul Attraction | Experience* | Item | ||
| Wandering Soul | Any | 1% and Above | 28.5% | 1x Bones 1x Big bones 1x Babydragon bones 1x Wyvern bones 1x Broken memento 1x Fragile memento |
~15 seconds |
| Sparkling Glyph | ~8 seconds |
||||
| Shambling Horror | 101% and Above | 57.1% | 1x Broken memento 1x Fragile memento 1x Spirit memento 20x Lesser necroplasm 20x Greater necroplasm |
~15 seconds |
|
| Corrupted Glyphs | Tier 2 Rituals and Above |
201% and Above | 85.7% | 1x Spirit memento 1x Robust memento 1x Powerful memento 30x Lesser necroplasm 30x Greater necroplasm |
~16 seconds |
| Soul Storm | 301% and Above | up to 114.3% divided over 3 ticks |
1x Robust memento 1x Powerful memento |
~10 seconds |
|
| Defile | Tier 3 Rituals Only | 501% or Above | 142.9% | 30x Ectoplasm 2x Greater ghostly ink 1x Powerful ghostly ink 1x Greater flaming skull 2x Robust memento 2x Powerful memento 25x Powerful necroplasm 1x  Necromancer's Necromancer'stome of experience |
~20 seconds |
*The experience gained for each disturbance scales to the player’s Necromancy level. The numbers listed in this column are a percentage of the experience gained from using a Small prismatic lamp.
Wandering soul will spawn on any side of the Ritual site.
| Action | gif | To-Do |
| Ignored |  |
Wandering soul travels from 1 side of the Ritual site to the other in 15 seconds |
| Completed |  |
Wandering soul dismissed (clicked) before it reaches the other side of the Ritual site |
Any of the glyphs you have access to/are using will begin to sparkle.
| Action | gif | To-Do |
| Ignored |  |
Glyph stops sparkling after 8 seconds |
| Completed |  |
Glyph is restored (clicked) before the time passes |
When the Shambling horror spawns, the chosen spot will give off green smoke briefly. If you missed the smoke, you can make it appear again by clicking on the Horror. Note that this Disturbance can be a bit unresponsive so it is recommended to click the Horror before clicking the chosen spot. Standing between them, while it makes the gif below more clearly depicted, is not strictly necessary.
| Action | gif | To-Do |
| Ignored |  |
Shambling Horror reaches the chosen glyph/candle in 15 seconds |
| Completed |  |
Chosen glyph/candle is clicked before the Horror reaches it. |
When corrupted glyphs spawn, there will always be 3 of them. Each one consists of a curved line with a number of vertical lines in the middle of the curve: one with 1 line, one with 2 lines, and one with 3 lines. Above them will be a shared bar representing the time remaining to deal with the disturbance. If you click the wrong glyph, you will not be penalized for it, but you will receive a popup telling you that you chose the wrong glyph, which will appear above the correct glyph to deal with next.
Note that while the word used to describe them is “glyphs," it is not the same as the ones that are drawn on the glyph spaces. These ones hover above the ritual site a small height and are presented vertically. They appear in a specific orientation that can make it difficult to see or click on them if you are not facing North. As such, it’s highly recommended to keep your camera facing North or to use the “Fixed camera" ritual interface feature.
| Action | gif | To-Do |
| Ignored |  |
Timer above the glyphs runs out in 16 seconds |
| Completed |
 |
Glyphs are deactivated (clicked) in order from 1 to 3 |
Soul storms will spawn atop one of the glyph or light source spots. Upon receiving the experience for the final phase, the item reward will be granted.
| Action | gif | To-Do |
| Ignored |  |
Storm of souls will vanish after 10 seconds |
| Completed |  |
Dissipate (click) the Storm to progress through the 3 phases, light will slightly change for each phase (each lasts around 3 seconds). Each phase will award experience when dissipated |
The most rewarding disturbance, defile can occur only in tier 3 rituals with a Spirit Attraction of 501% or more. A large pool of miasma will appear somewhere on the ritual site.
| Action | gif | To-Do |
| Ignored |  |
Miasma pool disappears after 20 seconds |
| Completed |  |
Siphon (click) the Defile. There is a chance of failing to continue siphoning, signified by a sizzling sound and some purple mist. If you do not click again when this happens, your progress bar for siphoning it will reset. The most reliable way to avoid this problem is to click the miasma every time your progress bar advances until it completes and you receive your reward. |
Between the start and conclusion of a ritual 3 things are guaranteed to happen and a 4th has a chance to happen.
Upon starting a ritual, all components used for the ritual, regardless of whether they are glyphs or light sources, will have their durability reduced by 1. Any components that reach a durability of 0 will be labeled as depleted and cannot be used to start a new ritual after the current one until they are repaired. This uses the same materials used to make them initially. If you have multiple components that need to be repaired, you can Right click the pedestal and select “Repair all" to fix them all at once (or you can repair them individually). You can check the durability of all your ritual components by Right clicking the pedestal and selecting “Check durability all," or any of the components individually by Right clicking them and selecting “Check durability."
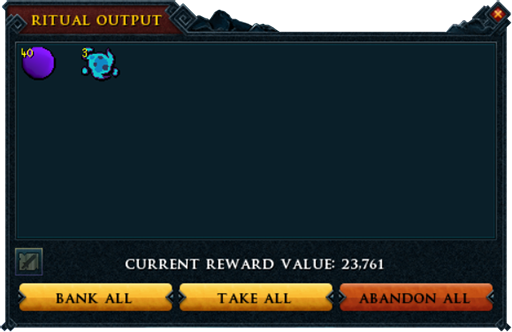
You will receive the output of the ritual. In simplest terms, you will obtain the remaining experience reward of the ritual (beyond what you earned while performing it) and any item outputs for the ritual will be added to the ritual chest. These outputs include the Ectoplasm and any item rewards from successfully completing disturbances.
If your focus storage contains another focus for your current ritual, it will automatically be placed on the pedestal. If the ritual you are performing has multiple foci that can be used for it, then it will prioritize the item that you used for the ritual you just completed. If you do not have another one in storage, then it will prioritize the highest tier focus possible for the same ritual you just completed. However, if no possible focus is present, then the pedestal will remain empty and you will have to add a new one manually.
Completing a ritual has a chance to spawn a Deathshead moth. If one spawns, you will receive a notification in your chat box. Catching a Deathshead moth awards Necromancy experience which is affected by the number of them that you have caught. The total amount of experience for catching 120 moths is 136,410 and the amount per moth increases each time you catch one, ranging from 6 to 2,640. You can catch no more than 120 moths total, 1 per Necromancy level. If you have caught a number of moths equal to your Necromancy level, then Deathshead moths will not spawn.The first time you catch a moth you will complete the achievement "On Death's Head Be It," but there is currently no way to see how many moths you have caught.
While the resources that can be obtained from completing disturbances are significant, they aren’t enough to be done in a sustainable manner. You will need to gather resources for your rituals from other sources.
As far as the foci for your rituals are concerned, there are some surprisingly easy sources. We have them outlined below.
Lesser Communions
Of the possible foci for lesser communions, the Wyvern bones are the most readily available to lower level players by way of Wilderness Flash Events rewards. The ability to quickly gather Bones or Big bones is mostly hampered by limited inventory space, which can be circumvented by using the upgraded Bonecrusher alongside either the Death Note relic or wearing an Underworld Grimoire, obtained by completing the Underworld easy tasks.
Greater Communions
There are a lot of plentiful options for greater communion foci. For mid and lower level players, the easiest method is going to be the killing of chromatic dragons for Dragon bones. For mid-high level players this can be done faster by killing Vindicta & Gorvek, as they drop Dragon bones in larger quantities. However, for players with the Death Note relic, the fastest foci will come from killing Dagannoth (level 78) with a Dwarf multicannon and Aggression potions. If you are at high or max levels, then you also have the option of killing Kerapac, the Bound for his noted Dragonkin bones drops, although all the troves from the Elder God Wars Dungeon have a chance of dropping them as well.
Powerful Communions
Unless you are comfortable killing Raksha, the Shadow Colossus or you do a lot of Big Game Hunter, your best bet for obtaining powerful communion foci is to kill Feral dinosaurs. They drop additional noted Dinosaur bones fairly regularly. The only other notable option is killing The Ambassador a lot, because he can commonly drop a sizable number of Reinforced dragon bones.
The most significant resource for the performance of rituals is by far the amount of ink needed. The inks are each made using Ashes, Vials of water, and Necroplasm of the appropriate tier (see the table below).
| Ingredients | Level | Product | Experience |
1x  Ashes Ashes
1x  Vial of water Vial of water
20x Lesser necroplasm
|
20 | 1x Regular ghostly ink |
21 |
|
1x Ashes
1x Vial of water
20x Greater necroplasm
|
60 | 1x Greater ghostly ink |
44 |
|
1x Ashes
1x Vial of water
20x Powerful necroplasm
|
90 | 1x Powerful ghostly ink |
60 |
When creating your inks, the biggest obstacle is easily the Ashes. While you can obtain them by making lines of fires using any logs, that method is both slow and click intensive. If you want to obtain a sizable amount of Ashes, we recommend 2 methods, both of which require wearing the Underworld Grimoire 1 or higher:
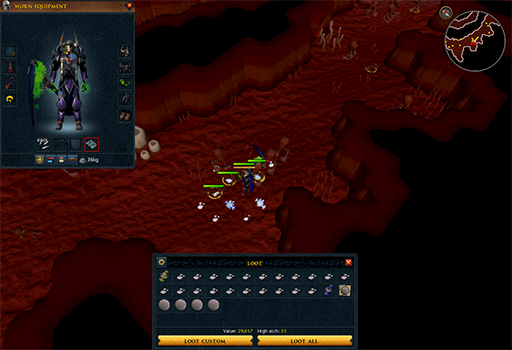
Method 1: Combat in the Abyss
This method requires completion of the Enter the Abyss miniquest and the combat level and gear necessary to camp in the abyss for extended periods without leaving. All the creatures in the abyss drop Ashes. We recommend using the area loot window interface for this setup. Continually kill everything that attacks you and pick up the Ashes. When they stop attacking you, you can either run to the other side of the Abyss or you can teleport out. Do not use this method if you do not have any fast teleport methods or several skills above level 30 (allowing you to get to the center of the abyss to escape combat). This method's yield varies a lot based on where you position yourself in the Abyss, how fast you can kill the enemies, and so on. With higher level gear and a good spot this can yield several dozen Ashes per minute.
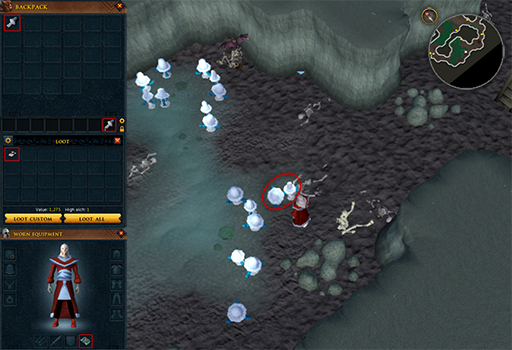
Method 2: Glowing fungus from the Haunted Mine
This method is more intense than the fire line method, but it yields Ashes at a far faster rate than fires and much more consistently than Method 1, especially for lower level players. It requires partial completion of the Haunted Mine quest (although total completion makes accessing it much simpler). Make your way through the Haunted Mine to the area where the Glowing fungus grows. Make sure you are wearing your Underworld grimoire, have area loot turned on, and have a Glowing fungus on your action bar with a keybind set for it. From there, simply repeat the following steps:
- Pick one of the Glowing fungus.
- Hit your Glowing fungus keybind, causing you to drop it; it will become Ashes on the ground.
- Hit your area loot keybind to refresh the area loot window.
- Hit your keybind to loot everything in the area loot window. Your Underworld grimoire will send the Ashes to your bank.
You can repeat this process very fast, limited only by how long it takes the fungus to regrow, which is about 2 seconds. It is possible to just keep picking them, but it is faster to pick the same spot because of the time it takes to move to different tiles. Even at a slow pace this method can easily yield 15 Ashes per minute.
As far as Necroplasm goes, your only significant obstacle is time. Each kind of necroplasm requires 200 necroplasm of the previous tier for the purposes of the ritual to make it. This makes it seem like you will need a lot more necroplasm than you actually do. So long as you make good use of Multiply glyphs, you will find the amount of necroplasm you need to ritualize is much smaller than expected. See the table of Necroplasm rituals for more information.
In order to begin upgrading your Necromacy gear, you will first need to complete Kili Row. Once done, you can upgrade your gear to tier 20 and will need to speak with Kili every 10 levels afterward to access the new upgrades. Unfortunately, it's not that simple. For every upgrade tier, Kili will requre that you complete tasks before she will teach you.
At level 70, the path will split. You will be given the ability to continue to learn the Tank (Deathwarden) route or choose to learn the Power (Deathdealer) upgrade. Note that you CAN learn both routes (one at a time for each level - whichever style you want first), however, your gear cannot change between the 2 styles after the tier 70 upgrade. As such, if you plan to do both styles, you will need 2 sets of armor.
Upgrading Necromancy gear MUST be completed at the Um Smithy. In addition to the items listed below, you will also ALWAYS need the previous tier item in order to upgrade something. Note that you can purchase T20 - T90 gear pieces from the Grand Exchange, however, you must have created the item at least once before you can equip it.
Death skull is the name of the Necromancy weaponry. It includes a Main-hand (Death guard) and an Off-hand (Skull lantern). These are obtained while completing Necromancy! and additional pieces can be purchased from Sostratus.
At level 70, the Death guard will gain a special attack called "Death Grasp" - costs 25% Adrenaline and has a 30 second cooldown. Using this attack will stun and bind your target for 4.8 seconds while dealing 405% - 495% Necromancy damage. It will deal another 40% damage for EACH Necrosis stack (consumed on use), totaling up to 885% - 975% with 12 stacks.
| Tier | Material(s) | Gear Piece | Total | |
| Death guard | Skull lantern | |||
| 20 |  Lesser Lesserensouled bar |
1 | 1 | 2 |
| 30 | 1 | 1 | 2 | |
| 40 | 2 | 2 | 4 | |
| 50 | 3 | 3 | 6 | |
| 60 |  Ensouled bar |
3 | 3 | 6 |
Bone runes |
25 | 25 | 50 | |
| 70 | Ensouled bar |
4 | 4 | 8 |
Bone runes |
50 | 50 | 100 | |
| 80 |  Greater Greaterensouled bar |
3 | 3 | 6 |
Miasma runes |
25 | 25 | 50 | |
| 90 | Greater ensouled bar |
5 | 5 | 10 |
Spirit runes |
50 | 50 | 100 | |
Bone runes |
50 | 50 | 100 | |
Flesh runes |
50 | 50 | 100 | |
Miasma runes |
50 | 50 | 100 | |
Deathwarden is where your Necromancy armoring begins. Your first full set (Tier 10) can be obtained from Sostratus for free and any additional pieces can be purchased from him as well.
All Necromancy gear is Deathwarden style until you reach level 70. At this point, and ONLY at this point, you can choose to change your gear from Deathwarden to Deathdealer when you upgrade it as long as you have completed the associated tasks. Note that once you change the style of your gear, you CANNOT revert it and must continue along the Deathdealer route for that armor piece.
| Tier | Material(s) | Gear Piece | Total | ||||
| Head | Top | Gloves | Bottom | Boots | |||
| 20 |  Lesser Lesserensouled cloth |
1 | 2 | 1 | 2 | 1 | 7 |
| 30 | Lesser ensouled cloth |
1 | 2 | 1 | 2 | 1 | 7 |
| 40 | Lesser ensouled cloth |
1 | 2 | 1 | 2 | 1 | 7 |
 Lesser Lesserensouled thread |
1 | 1 | 1 | 1 | 1 | 5 | |
| 50 | Lesser ensouled cloth |
1 | 2 | 1 | 2 | 1 | 7 |
| Lesser ensouled thread |
1 | 1 | 1 | 1 | 1 | 5 | |
Spirit runes |
20 | 20 | 20 | 20 | 20 | 100 | |
| 60 |  Ensouled cloth |
1 | 2 | 1 | 2 | 1 | 7 |
 Ensouled thread |
1 | 1 | 1 | 1 | 1 | 5 | |
Spirit runes |
25 | 25 | 25 | 25 | 25 | 125 | |
| 70 | Ensouled cloth |
2 | 3 | 2 | 3 | 2 | 12 |
Ensouled thread |
2 | 2 | 2 | 2 | 2 | 10 | |
Flesh runes |
20 | 20 | 20 | 20 | 20 | 100 | |
| 80 |  Greater Greaterensouled cloth |
1 | 2 | 1 | 2 | 1 | 7 |
 Greater Greaterensouled thread |
1 | 1 | 1 | 1 | 1 | 5 | |
Flesh runes |
25 | 25 | 25 | 25 | 25 | 125 | |
| 90 | Greater ensouled cloth |
2 | 3 | 2 | 3 | 2 | 12 |
| Greater ensouled thread |
2 | 2 | 2 | 2 | 2 | 10 | |
Spirit runes |
20 | 20 | 20 | 20 | 20 | 100 | |
Bone runes |
20 | 20 | 20 | 20 | 20 | 100 | |
Flesh runes |
20 | 20 | 20 | 20 | 20 | 100 | |
Miasma runes |
20 | 20 | 20 | 20 | 20 | 100 | |
Deathdealer Gear (Power Armor)
At level 70 you can finally choose to alter the style of your armor from Tank to Power. Note that you will still require the T60 Deathwarden pieces to upgrade into your T70+ Deathdealer gear and once your gear is Deathdealer, it CANNOT be reverted to Deathwarden.
| Tier | Material(s) | Gear Piece | Total | ||||
| Head | Top | Gloves | Bottom | Boots | |||
| 70 | Ensouled cloth |
2 | 3 | 2 | 3 | 2 | 12 |
Ensouled thread |
2 | 2 | 2 | 2 | 2 | 10 | |
 Hermodic plate |
1 | 1 | 1 | 1 | 1 | 5 | |
Bone runes |
45 | 45 | 45 | 45 | 45 | 225 | |
| 80 | Greater ensouled cloth |
1 | 2 | 1 | 2 | 1 | 7 |
| Greater ensouled thread |
1 | 1 | 1 | 1 | 1 | 5 | |
Hermodic plate |
2 | 2 | 2 | 2 | 2 | 10 | |
Miasma runes |
25 | 25 | 25 | 25 | 25 | 125 | |
| 90 | Greater ensouled cloth |
2 | 3 | 2 | 3 | 2 | 12 |
| Greater ensouled thread |
2 | 2 | 2 | 2 | 2 | 10 | |
Hermodic plate |
3 | 3 | 3 | 3 | 3 | 15 | |
Spirit runes |
25 | 25 | 25 | 25 | 25 | 125 | |
Bone runes |
25 | 25 | 25 | 25 | 25 | 125 | |
Flesh runes |
25 | 25 | 25 | 25 | 25 | 125 | |
Miasma runes |
25 | 25 | 25 | 25 | 25 | 125 | |
Frankly, the best way to train Necromancy is by doing Slayer tasks in a similar combat range to your Necromancy level. You can train efficiently on just about any low level monsters until level 24 or so, but keeping up with gear upgrades and completing quests as they become doable is going to keep you busy most of the way to 99. If you’re not sure what Slayer Master to get tasks from for this purpose, we recommend tasks according to the table below. Keep in mind that some Slayer tasks will require the use of specific equipment, such as Dragonbane weaponry for Rune dragons, preventing them from being a good Slayer task for using Necromancy.
| Necromancy Level Range | Slayer Master | Location | Master's Additional Requirements |
| 24 - 46 | Mazchna | Canifis | 20 Combat |
| 46 - 60 | Vannaka | Edgeville | 40 Combat |
| 60 - 75 | Chaeldar | Zanaris | 75 Combat Lost City |
| 75 - 85 | Duradel / Lapalok | Shilo Village | 100 Combat 50 Slayer Shilo Village |
| 85 - 95 | Kuradal | Ancient Caverns | 110 Combat 75 Slayer |
| 96+ | Laniakea | Anachronia | 120 Combat 90 Slayer |
| Mandrith | Deep Wilderness | 85 Slayer | |
| Morvran | Prifddinas | 120 Combat 85 Slayer Plague's End |
- Quest: Necromancy!
- Activate the City of Um lodestone
- Collect a set of Deathwarden robes from Sostratus
- Level from 5 to 20
- Quest: Kili Row
- Level from 20 to 24
- Quest: Rune Mythos
- Level from 24 to 46
- Quest: Vessel Of The Harbinger (Requires: Ghosts Ahoy & Rune Mythos)
- Level from 46 to 54
- Quest: Housing of Parliament
- Level from 54 to 60
- Tier 2 Ritual Site unlocked
- Level from 60 to 65
- Quest: The Spirit of War (Requires: Vessel Of The Harbinger)
- Quest: That Old Black Magic (Requires: The Blood Pact & The Spirit of War)
- Level 32: My One And Only Lute
- Level 45: Skelly By Everlight
- Level 50: Flesh And Bone
- Level 65: Hermy And Bass
- Level from 65 to 75
- Quest: Tomes of the Warlock (Requires: The Spirit of War)
- Level from 75 to 85
- Quest: Remains of the Necrolord (Requires: Tomes of the Warlock, Nadir, & Vengeance)
- Level from 85 to 90
- Tier 3 Ritual Site unlocked
- Level from 90 to 95
- Quest: Alpha vs Omega (Requires: Remains of the Necrolord)
This Skill Guide was written by 3ter 1 and ChathMurrpau. Thanks to Ksb Single, Sy Accursed, Robbie for corrections.
This Skill Guide was entered into the database on Sun, Sep 03, 2023, at 04:58:34 PM by Chath, and it was last updated on Sat, Aug 24, 2024, at 11:01:48 PM by 3ter1.
If anything is incorrect or missing, or if you have any new information to submit to this database, please submit it to us on our Content Submissions Forums.
If you see this guide on any other site, please report it to us so we can take legal action against anyone found stealing our content. This guide is copyrighted by RuneHQ, and its use on other sites is expressly forbidden. Do not ask if you can use our guides or images, the answer is and always will be NO!
Print this page with images - Back to the Skill Guide Index Page - Back to Top